Painting Historic Buildings: Tips for Preserving Your Heritage Home
 by michael daigle
Summary
Thinking about giving your historic home a fresh coat of paint? Before you grab a brush, there are some important steps to consider. Whether you own a Victorian manor or a Craftsman bungalow, preserving its character is essential. A rushed project could damage architectural details or even reduce your property’s value. The key is to research, use high-quality historically accurate supplies, and take your time. With care, you can refresh your heritage home while honoring its history and charm. Let’s walk through the steps for painting your historic property the right way.
Assessing the Existing Paint on Your Historic Home
Start by evaluating the condition of your home’s current paint. Inspect every exterior surface for signs of wear such as cracking, peeling, blistering, or chalking. Check wood siding and trim for rot or water damage and plan for necessary repairs before repainting.
Pay attention to the existing paint color and finish. For authenticity, aim to match the home’s original style. Research color palettes that were popular when your house was built. Flat, satin, or eggshell finishes often work well with older architecture.
Test paint samples to identify their composition. Many older layers may contain lead, while more recent coats could be latex or oil-based. Compatibility is crucial for adhesion. If lead is present, hire a professional who can follow safety protocols.
Don’t forget the primer. A solid primer layer helps new paint bond properly. If existing primer is deteriorating or you’re working with bare wood, apply a primer designed for that surface before moving forward.
Once you’ve evaluated and addressed these factors, you’re ready for the enjoyable part—choosing a new color scheme and applying fresh paint that revitalizes your historic home.
Selecting Appropriate New Paint Colors for a Heritage Property
Choosing colors for a historic home is about balance—honoring the building’s era while ensuring it looks vibrant and welcoming today.
Tips for Choosing Colors
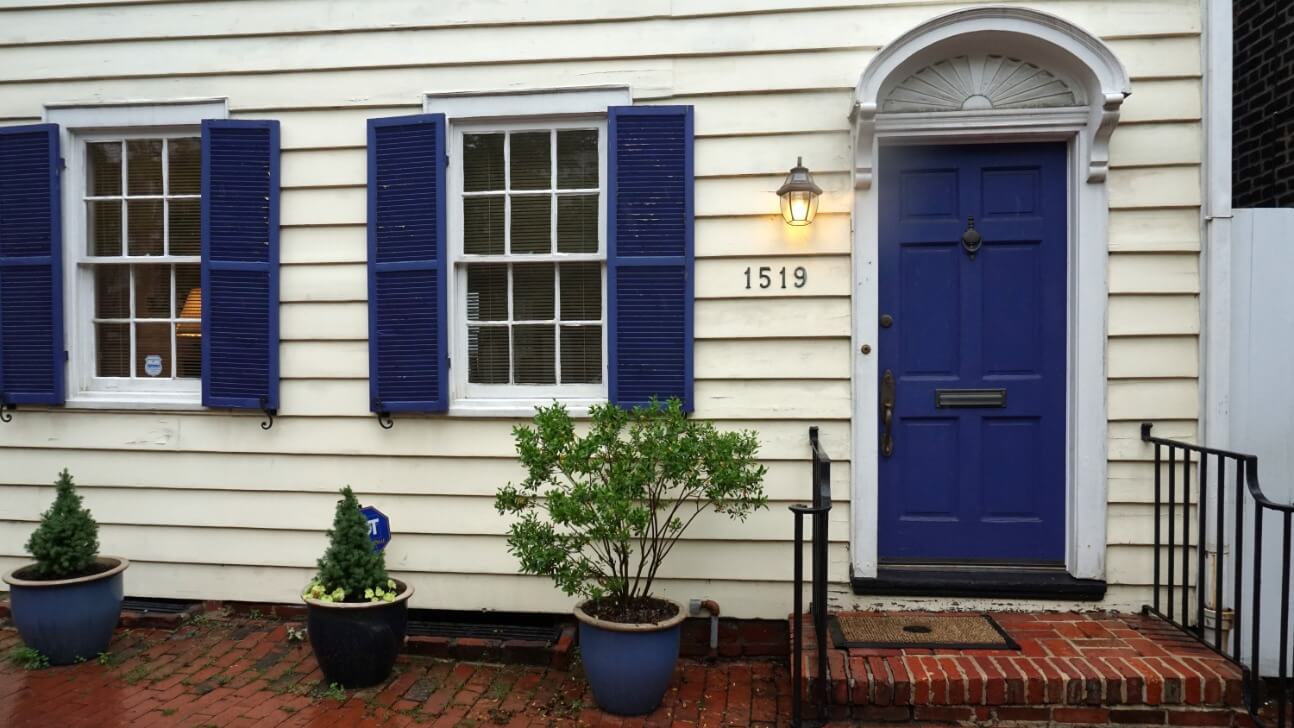
Research the period your home was built to uncover historically accurate palettes. Victorian homes often featured deep reds, greens, and blues, while Craftsman bungalows embraced earthy tones like sage, terra cotta, and ochre.
Use colors to highlight architectural details. Trim, millwork, and stained-glass accents should stand out rather than blend into the background. Complement your home’s surroundings by pulling inspiration from natural elements, but choose richer shades for the main body to ensure depth.
Build a balanced color scheme: one dominant shade for large areas like siding, a secondary color for trim, and an accent color for doors or shutters. Too many similar tones can feel flat, while too many bold hues may overwhelm.
Always test your choices in real conditions. Apply small swatches to the exterior and view them at different times of day. Lighting and weather can dramatically change how a color appears.
With patience and testing, you’ll land on a palette that highlights your home’s best features while staying true to its history.
Choosing the Right Type of Paint for Historic Buildings
Selecting the right paint type is crucial. The wrong product can damage original materials and diminish your home’s historic character.
Oil-Based Paint
For many historic exteriors, oil-based paint is preferred. It expands and contracts with wood or metal, offering durability and fade resistance. Be aware that it takes longer to dry and has stronger fumes, so ensure proper ventilation.
Latex or Acrylic Paint
Indoors, latex or acrylic paints are ideal. They’re water-based, low-odor, and fast-drying. Test first if applying to plaster or unusual surfaces. For exteriors, latex may work on stucco or concrete but often struggles to adhere well to wood or metal.
Primers
Primers are essential, especially when transitioning between paint types. Oil-based primers are best for wood or plaster, while latex primers suit masonry surfaces like brick or stucco.
Sheens
Satin, eggshell, or semi-gloss sheens generally look best on historic buildings, adding subtle protection. Avoid high-gloss finishes on textured surfaces, as they emphasize imperfections. Flat paint, while authentic, offers minimal durability.
Color Selection
Use historic palettes and always test paint samples on your home before committing. Observing colors in natural light ensures your choice fits the building’s style and environment.
By choosing the right paint and finish, you’ll preserve your home’s charm while safeguarding its materials.
Prepping and Repairing Surfaces on Older Structures
Proper preparation is the foundation of a successful paint job. Historic homes often require special care due to the unique materials used in their construction.
Inspect for Damage
Examine your exterior for cracks, rot, insect damage, or water stains. Small flaws can be repaired with putty, caulk, or filler. Larger structural issues, like compromised siding or masonry, may require professional repair.
Clean Thoroughly
Remove dirt, mildew, and loose paint before repainting. For wood siding, scrub with detergent and rinse with a hose—skip pressure washing to avoid damage. For brick or stone, use a stiff brush with masonry cleaner. Allow everything to dry completely.
Lightly Sand Rough Surfaces
Sand lightly to smooth uneven areas and help paint adhere. Use a tack cloth to remove dust. Be gentle with wood and avoid sanding masonry, which can weaken the surface.
Prime Bare Surfaces
Apply primer to all bare or repaired areas. Oil-based primers suit wood, while masonry requires specialized concrete, stucco, or brick primers. Some surfaces may need multiple coats for full coverage.
Taking time to carefully inspect, clean, and prepare ensures your historic home’s paint job lasts longer and maintains its character.
Using Proper Painting Techniques for Historic Homes
Once preparation is complete, focus on technique to achieve a polished, durable finish.
Choose a Historically Appropriate Paint
Select paints made for older structures that allow surfaces to breathe and offer authentic finishes. Match colors to the home’s original palette when possible.
Prepare the Surface Thoroughly
Remove debris, fill cracks, and sand where necessary. Prime all bare areas. If old lead paint is present, hire a professional for safe handling.
Use the Right Tools and Technique
Invest in high-quality brushes for detailed work and rollers for large flat areas. Apply at least two coats, brushing in the direction of the wood grain for consistency. Patience and even strokes are key.
Protect the Finished Surface
Once dry, seal your paint with a clear protective topcoat, particularly in outdoor or high-traffic areas. Reapply every few years to maintain durability.
Consider Repainting in Sections
Large projects are easier when broken into sections. Start with the most visible or weathered areas, then move systematically. This approach prevents rushed results and ensures even coverage.
With thoughtful techniques and steady effort, your historic home can shine again—preserved for generations while showcasing a renewed, vibrant look.
Common Mistakes to Avoid When Painting Heritage Buildings
Painting a historic home requires care and precision. Certain mistakes can cause lasting harm to your property’s character and value. Avoid these pitfalls to protect your investment and preserve its heritage.
Using Modern Paints
Standard latex or acrylic paints are not suited for older homes. These modern products often trap moisture within walls, leading to rot and decay. Instead, use breathable paints designed for heritage buildings, such as limewash or milk paint, which allow walls to release moisture naturally.
Failing to Prep Properly
Skipping thorough preparation is one of the most common mistakes. Clean, scrape, sand, and patch damaged areas before painting. Removing loose or failing paint ensures new paint adheres well and creates a durable, attractive finish.
Ignoring Cracks and Holes
Even the smallest crack or hole can let water in, causing hidden damage. Inspect the entire structure and seal all gaps before painting. Caulk, wood filler, and masonry sealants provide reliable solutions for most issues.
Not Priming
Priming bare wood or masonry is essential. Primer strengthens the bond between the surface and paint, extending durability. Choose a primer tailored to the material—wood, masonry, or metal—for the best protection.
Using Dark Colors
Dark shades absorb heat, which can warp and crack wood siding while accelerating wear. Lighter, historically accurate tones are safer choices that last longer and better reflect the building’s heritage.
DIY-ing Difficult Areas
Complex features like high elevations, ornate trim, or delicate details are best left to skilled professionals. Preservation contractors have the training, equipment, and experience to complete the work safely while respecting your home’s character.
By steering clear of these common mistakes, you’ll help ensure your historic property maintains its beauty and integrity for generations.
Hiring Qualified Contractors for Historic Preservation Projects
Choosing the right contractor is just as important as choosing the right paint. Historic preservation demands specialized skills and sensitivity that not every professional has.
Seek out contractors certified or experienced in historic preservation. They are familiar with the Secretary of the Interior’s Standards for Rehabilitation and know how to protect original features while using appropriate materials and techniques.
Ask for References
Always ask for references from past clients who own historic properties. Inquire about the contractor’s respect for architectural details, quality of work, and reliability in terms of schedule and budget.
Review Their Portfolio
A contractor’s portfolio showcases their craftsmanship. Look for completed projects on homes similar in age and style to yours. Pay close attention to details such as woodwork restoration, period-appropriate color application, and seamless masonry repairs.
Discuss Your Home’s Needs
Clearly explain your home’s history, architecture, and areas needing attention. A skilled preservation contractor will recommend treatments and materials tailored to your property, balancing historical accuracy with modern functionality where appropriate.
Taking time to select the right contractor ensures that the work both preserves and enhances your historic home.
Balancing Preservation and Personal Style in a Historic Home
Updating a historic home is about finding harmony between preservation and personalization. While it’s vital to protect original character, your home should also reflect your lifestyle and tastes.
Focus on Non-Permanent Changes First
Start with reversible updates like light fixtures, hardware, or historically appropriate paint colors. These small changes make a big impact without altering the structure.
Choose Timeless Over Trendy
Invest in enduring pieces—like clawfoot tubs, farmhouse sinks, or coffered ceilings—that nod to the past while remaining stylish and functional today.
Retain Original Architectural Details
Preserve and restore features like molding, wood floors, built-ins, and stained glass. These details are irreplaceable and define your home’s historic character.
Add Vintage-Inspired Accents
Decor choices can highlight your home’s heritage. Consider antiques, botanical prints, vintage rugs, or refurbished furniture that blend old-world charm with modern comfort.
Consider an Addition for Modern Function
If more space is needed, design additions that complement the existing structure in scale, style, and material. Attach them in reversible ways to maintain architectural integrity.
With thoughtful updates, your historic home can reflect your personal style while staying true to its legacy.
Painting Historic Buildings FAQ: Your Top Questions Answered
Caring for a historic home requires diligence, especially when it comes to painting. Here are answers to some of the most frequently asked questions.
What Type of Paint Should I Use?
For exteriors, choose premium breathable acrylic latex paints or traditional finishes suited for historic homes. These protect against weather while allowing moisture to escape. Use durable alkyd enamels for trim and accents, and stick with satin or eggshell sheens.
Should I Stick to the Original Color Scheme?
Your decision depends on the architectural style and period of your home. Victorians often feature rich, bold tones, while Craftsman homes favor earthy, nature-inspired hues. When in doubt, consult preservation groups for guidance.
How Do I Prep and Prime the Surface?
Clean surfaces thoroughly, remove loose paint, and sand glossy areas to create adhesion. Prime bare wood and masonry for longevity. If existing paint is in good condition, primer may only be needed for touch-ups.
How Do I Paint Architectural Details?
Use angled brushes for precision work on trim, eaves, and decorative elements. Remove hardware before painting, and for high or intricate surfaces, paint from the top down. Apply accent colors first for neat edges.
How Often Should I Repaint?
Generally, repaint every 5–8 years. Monitor for blistering, peeling, or cracking, and repaint as soon as problems appear to protect underlying materials.
With careful maintenance and the right products, your historic home will stay beautiful and resilient for years to come.
Final Thoughts
Painting a historic home may feel daunting, but with research, the right products, and patience, it becomes a rewarding project. Each coat of paint not only refreshes your home’s appearance but also honors its craftsmanship and ensures it continues to inspire future generations.